
Decals Application Guide
Private Owner Mineral Wagons
This guide provides additional details for how to apply my decals for private owner mineral wagons, and other decals for complete wagon sides, to your models. It is assumed that you are familiar with the general instructions for applying my decals, as described in the standard full application guide in the Help & Advice section of the Aardstorm Models website, and the summary version supplied in printed form with your first order. So if you haven't already done so, please read that information first.
This guide is also available in downloadable form here, for you to refer to offline, or print out.
Terminology
To help with the terms used in the descriptions below, the following diagram identifies the major components of a typical open or mineral wagon, with wooden body and underframe.
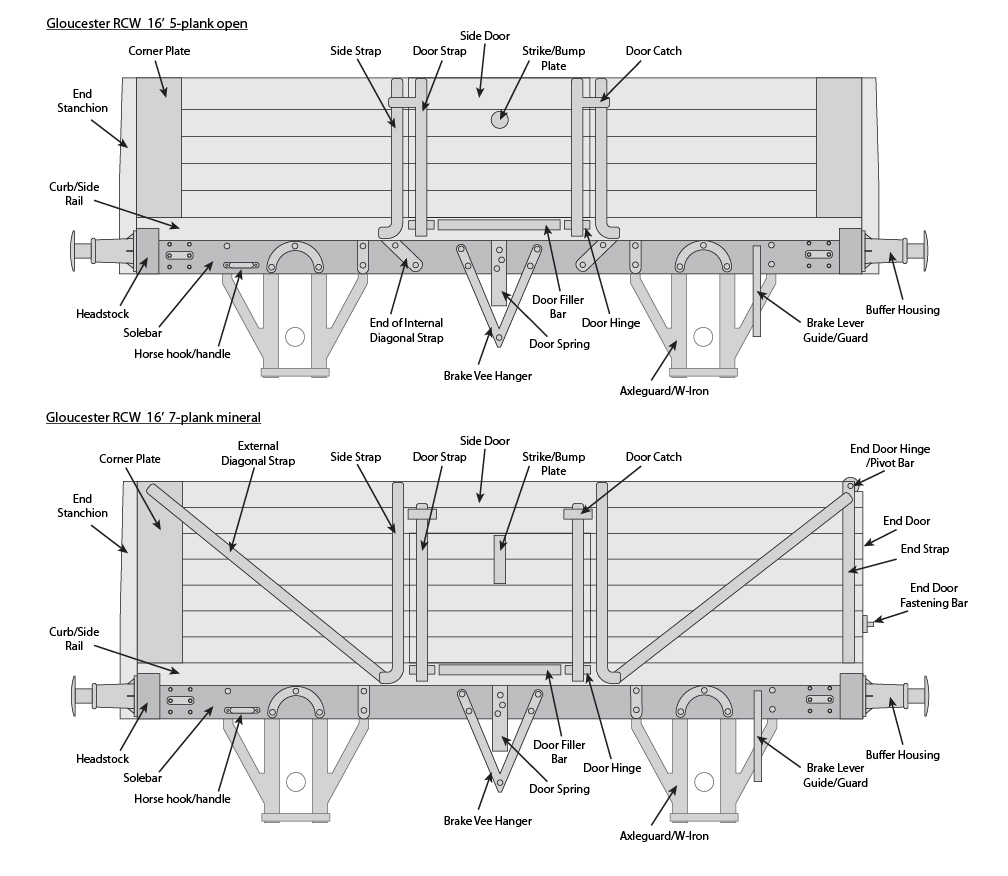
I draw a distinction between open wagons and mineral wagons, although both types as private owner wagons were used to carry minerals such as coal and coke:
- An open wagon is one with drop-down side doors that extend the full height of the body sides, and does not have end or bottom doors. It is thus identical to the wagons used to carry general merchandise.
- A mineral wagon is one with side doors for which the drop-down part stops short of the top of the body sides. It may have additional door(s) above the drop-down part that could be hinged at the sides or open vertically. Otherwise the topmost planks continue uninterrupted across the door opening. Mineral wagons may also have a door at one end, opening the full width and height of the wagon body and hinged at the top, and/or doors in the floor of the wagon. Such wagons were generally only used for mineral traffic.
- A coke wagon is essentially a mineral or open wagon with additional planks on top called rails or raves. The raves often had gaps between them and were sometimes removable, allowing the wagon to also be used as a normal mineral wagon. Sometimes the raves had no gaps, making the wagon a tall one with more than the usual number of planks. Decals are not included for the raves with gaps.
The Decals
A set of decals for a private owner mineral (or open) wagon will consist of a number of individual decals, each type of which are illustrated in the following image (click on the image to open a larger version in a new browser tab or window):
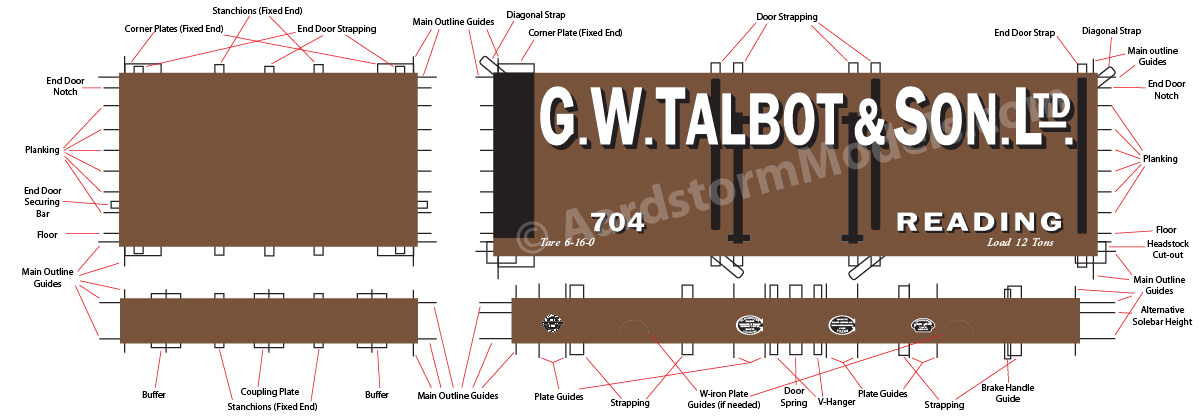
- A decal for each side of the body of the wagon. Note that for a wagon with an end door, the sides are different, one having the door on the right (as shown), the other on the left. The other livery elements are adjusted accordingly.
- A plain decal for each end of the wagon.
- A decal for each solebar, excluding the headstocks.
- A decal for the face and ends of each headstock.
As standard, at least one spare of each different decal is included. If space on the sheet is limited, the solebar decals may be provided as small, separate decals for each plate or marking, and the end decals may be omitted altogether, with any contained plates or markings again provided as separate small decals.
The decals are therefore quite large, especially in the larger scales, making them tricky to handle once wet. It is up to you whether you apply the decals in one piece, as designed, or cut them into smaller sections. One-piece application is probably practical in the smaller scales, where raised surface detail on your model is sufficiently shallow to not cause problems with the sit or distortion of the decals. In the larger scales such detail is likely to be high/thick enough to significantly “shorten” a one piece decal because of the extra length needed to wrap it around the projections. It is therefore likely to be better to cut the decals into sections along the edges of such details.
The decals are difficult to cut cleanly once wet, so the cuts should be made before soaking the decals in water. To help with cutting the decals around ironwork, cutting guides are provided around the edges of the decal to mark the likely positions of the ironwork. The positions of planking joints are similarly marked – if you need to cut the decal horizontally, the edges are generally less visible if they coincide with such planking joints. The functions of the various cutting guides are also indicated in the diagram above, and described further below.
You won't need to use all of the guides; it is up to you to choose which (if any) you need to use. The guides have been positioned according to drawings or photos for the appropriate prototype (or for customised decals, photos you provide of your actual model). Their positions may therefore not match the corresponding features on your model. For those guides you want to use, check their positions against your model before making the cuts, and adjust the guide positions if necessary, e.g. by making pencil marks.
Small projections such as bolt heads can usually be allowed to pierce through the decal during application. Once the decal is in position, press down firmly on the projections using your finger or a soft pad (such as kitchen paper folded on itself several times). Be sure to apply only vertical pressure; sideways pressure will cause the decal to slide out of position. Piercing of the decal can be assisted, if necessary, by using the tip of a sharp knife: either a single small "prick", or a small cross. Larger, but still small, projections can likewise be accommodated by small cuts during application. Cuts of significant length are best achieved by rocking the blade of a round knife along the cut, rather than dragging the point of a straight knife.
Please also note the following:
- The overall size of each decal is slightly enlarged, with cutting guides provided to mark the actual size. This reduces the risk of any slight misalignment of your cut resulting in the inclusion of white background.
- The body side decals usually include the corner plate(s) at one or both ends. in all but the smallest scales it is probably better to cut the corner plates from the rest of the side and apply them separately, if at all. The same is true of the vertical strap at the end door end.
- Plank edge detail, as seen in the livery and wagon type illustrations, is not present in the decals, unless you select certain weathering options. This is in case the plank detail on your model doesn't exactly match that in the design. Cutting guides are provided instead, in case you wish to cut the decals into sections horizontally to aid application; it minimises the appearance of decal edges if they coincide with surface detail.
- Ironwork edge detail is similarly omitted, again unless you select certain weathering options. Ironwork is therefore normally only included if it is picked out in a different colour in the design. Ironwork on the solebar decals is omitted altogether, even if a different colour, in case the positions don't match your model. Such details also often have significant height from the solebar surface, sufficient to cause problems if the decal were applied in one piece, even in the smaller scales.
- Cutting guides are again provided to mark the positions of the ironwork in case you wish to cut the decals into sections vertically; the appearance of the decal edges is minimised if they coincide with the physical surface detail. The guides for each ironwork strip are linked together to indicate the width of the strip. For 'L' section ironwork, you may only need to make one cut, along the side of the strip with the raised rib. Similarly, 'T' section ironwork may only need to be cut down its centreline. However, if the flat part of the ironwork is too thick to allow the decals to sit properly, you may need to cut along both sides of the strip. This is also true of flat ironwork in the larger scales.
- Such cuts will leave gaps between adjacent parts of the decal, requiring more touching-up of the decal edges. On the prototype, lettering is generally arranged to avoid raised ironwork, but this is not always the case. Where lettering crosses a gap in the decal coverage because of ironwork, you will need to fill in the gap between the two parts of the decal with appropriate paint: use paint that matches the lettering colours in the decal as closely as possible, perhaps mixing a small quantity if you can't find a matching standard paint colour.
- The solebar decals for wooden underframed wagons are extended up to floor height. The curb rail usually significantly overlaps and is separated from the top of the solebar in such wagons. Additional cutting guides are provided at curb rail level, in case your model doesn't include this recess behind the curb rail.
- The solebar decals for steel underframed wagons are design to fit neatly inside the solebar channel section, typically 9 inches high, less the thickness of the top and bottom ribs.
- Where plates (such as registration and builder's plates) and other markings are included in the solebar decals, vertical cutting guides are provided either side of each plate and spaced a small distance away to provide a border for subsequent touching up of the decals edges. Because of the all of the ironwork likely to be present on the solebar, it will probably be better to just cut out and apply separate decals for each plate or marking, discarding the rest of the solebar decal. The solebar decals may be supplied as separate decals anyway, rather than a complete strip.
- In some cases the registration plates were tucked under the semi-circular washer plates for the W-irons, and were a tight fit. The vertical plate guides cannot be used in this case, so instead a dark dotted line is marked on the solebar decal to indicate where the edge of the washer plate should be.
- The end decals, if present, will need to be cut vertically into sections to fit between the end stanchions of the fixed end, or for the door end, vertically to fit between the vertical strapping and horizontally to fit around the end door fastening bar. The overall width of the end is set according to the type of wagon you select: 7 ft 6 in. was common for earlier wagons, later wagons were 8 ft wide. It is up to you to work out where such cuts need to be made, to match your wagon, but cutting guides are provided for the corner plates and typical stanchion positions for a fixed end, and at typical positions for the end door ironwork.
- For the end headstock decals, if present, you will need to cut the headstock decals into sections to accommodate any end stanchions and the buffers and couplings; cutting guides are provided to mark these features at typical positions and sizes.
If you do try to fit the decal as a complete side, perhaps as an experiment using a spare decal to find out which ironwork is going to cause problems, start by aligning a long edge with the top or bottom of your wagon side, making sure to position it centrally. Carefully slide the backing paper away while holding the edge of the decal in place in several places. Then work outwards from the centre of your wagon pressing the decal down, removing any bubbles and creases, and tucking it around raised ironwork or into planking recesses using suitable tools (see Step 7 of the main Application Guide). If this results in a satisfactory fit of the decal to your model, that's great, repeat for the other side. If not, it will probably be better to remove the decal and replace it with another copy with appropriate cuts (or even cut into separate sections) to avoid problem ironwork, as described above.