
Carriage Curtains
These components are 3D-printed in UV resin, and are available in two basic types, each in two styles, and in a variety of scales. These curtains are intended to be fitted inside the windows of your model railway carriage. They are modelled on the curtains fitted to BR Mk1 carriages (first class compartments/sections), but may be equally suitable for other prototypes - you can configure the window size for your curtains. The basic types are:
- Flat, for use with my curtain decals, available here, or
- Moulded to represent the folds of real curtains, for you to paint an appropriate colour.
Each type is available in two styles, shaped to represent loosely hanging or tied back curtains. All four combinations are available in 7 sizes, to represent curtains that have been drawn across the window to different degrees, and these sizes match those of my decals. All of these components are shown below (for 4mm scale components).
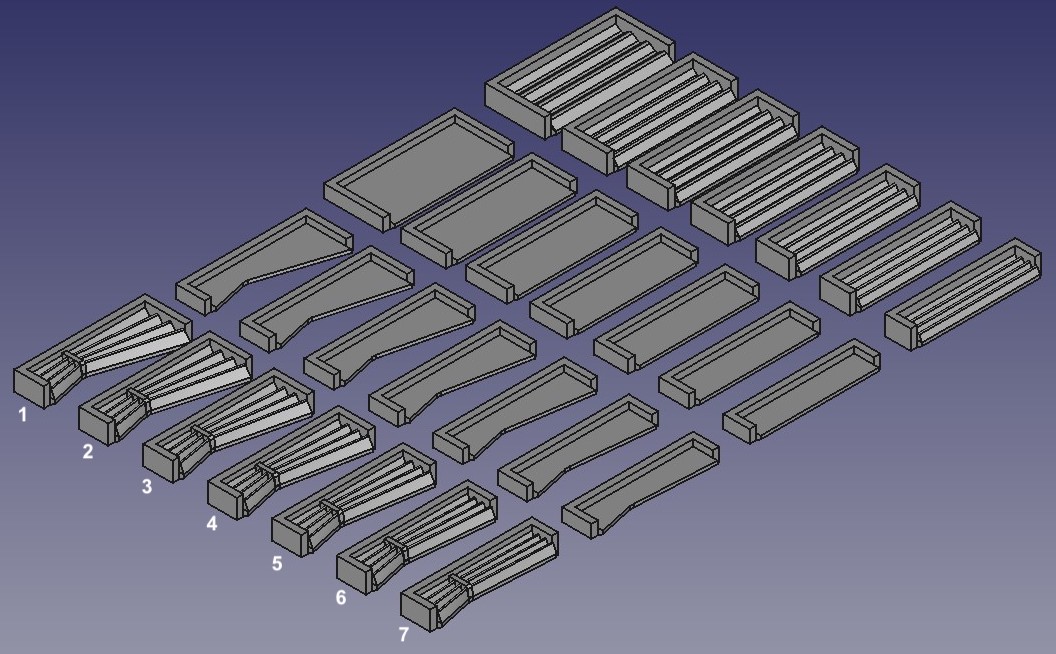
Curtain Types and Styles
Note: Clicking on any of the images on this page, such as that above, will cause a larger version of the image to appear in a new tab or window of your browser (depending on how your browser is set up).
The curtains shown above are all for the left-hand side of the window (as looking from the outside). All curtains will be supplied in mirror-image pairs, to fit on either side of the window. To add greater variety to your carriages, you can also fit different styles and sizes to each side of a window.
In all cases, the reverse (inside) of the curtains is flat, and the curtains are edged on 3 sides with a rib that is intended to be attached to the carriage side while keeping the curtain representation off the window glazing. The fourth side should face the middle of the window, and is chamfered to minimise the apparent thickness of the "curtains".
There are two ways to fit these curtains to your model carriage:
- Take the glazing material well beyond the edges of the actual window aperture, then stick the curtains to the glazing. This runs the risk of excess glue intruding into the window aperture, where it will be visible from outside, and very difficult to remove. Use a minimum amount of glue and avoid moving the curtains over the glazing. Making some sort of jig may help to get the curtains in a consistent position over the window, and get them in the correct place first time, with minimal subsequent adjustment.
- Only take the glazing a limited distance beyond the edges of the window aperture, so that the ribs on the curtains fit around the glazing and are glued to the actual carriage side. This minimises the risk of excess glue intruding into the window aperture, but requires that the glazing is fitted to the carriage side squarely and with equal overlap on each side, and top and bottom. Again, creating an appropriate jig may help get the glazing in a consistent position.
The curtain components can be configured with a border between the ribs and the intended window aperture that can accommodate either of the above methods of fitting.
Configure Your Curtains
To keep the range of configurable values down across the range of scales, certain dimensions of the curtain components are specified as scale (prototype) inches, rather than model (mm) dimensions. A calculator and look-up table to help convert scale inches into model dimensions (or vice versa) is available here (opens in new browser tab/window).
Note: If you want a curtain component that is not covered by the standard options below, I will be happy to quote you for a customised set of components. Please contact me with full details.
To order some of my curtain components, you can select one or more basic packs from the following (£6.50 each):
Pack FL, Flat, for loose curtains, 1 pair of each of the 7 sizes. |
|
Pack FT, Flat, for tied-back curtains, 1 pair of each of the 7 sizes. |
|
Pack ML, Moulded, for loose curtains, 1 pair of each of the 7 sizes. |
|
Pack MT, Moulded, for tied-back curtains, 1 pair of each of the 7 sizes. |
|
And/or, select one or more individual pairs of curtains as required (£0.95 per pair):