
Ridge Tiles
Strip Types
This page describes my current range of model ridge tile components, that are to be fitted to the ridges of the roof of your model building. These are 3D-printed in UV resin, and are available in a selection of styles, shapes, sizes, and in a variety of scales. The current range of basic ridge tile strip types is shown in the illustration below:
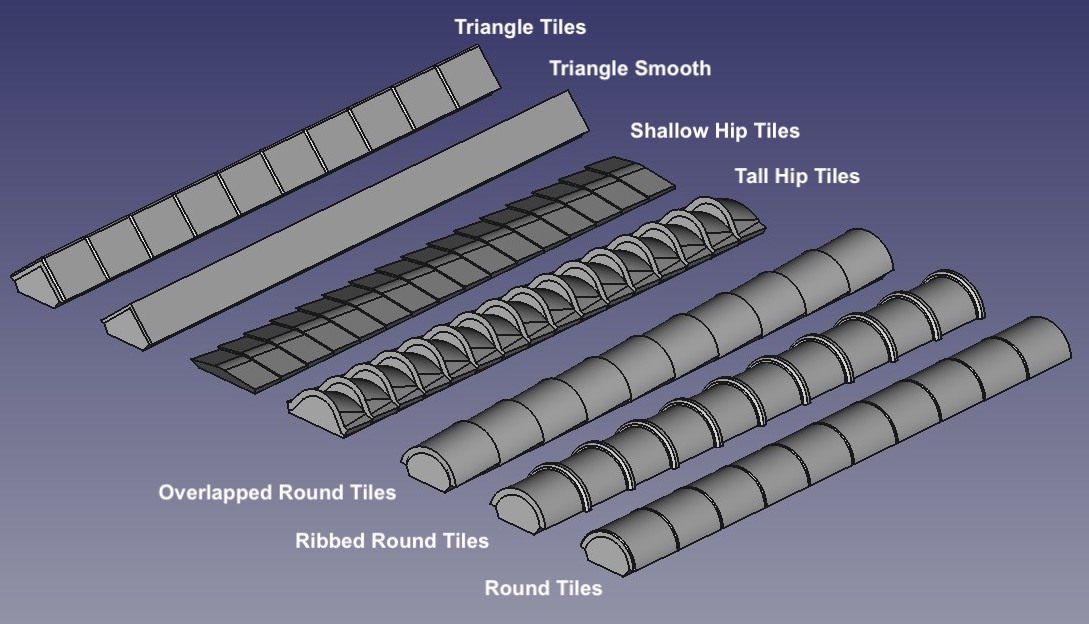
Ridge Tile Strip Types
Note: Clicking on any of the images on this page, such as that above, will cause a larger version of the image to appear in a new tab or window of your browser (depending on how your browser is set up).
The basic strip types available represent triangular or round tiles for the main roof ridges, or special tiles for the sloping ridges of a hipped or pyramid roof. The triangle and round types can also be used on hip ridges. The strips are configurable for overall length, and tile length and height. The triangle types are also configurable for angle of slope. The strips may be configured with a representation of tiles butted end-to-end, with a ribbed joint, or overlapping (the overlapped and ribbed styles are shown for round tiles, but may also be specified for triangle tiles). The strips may also be configured without any tile representation, to model the case where the roof ridge is covered with lead flashing (or similar).
Model Roof Preparation
Hip Ridge Details
End Tile Types
Junction Tile Types
Ridge Decoration Types
Pierced Ridge Decoration
Finial Types
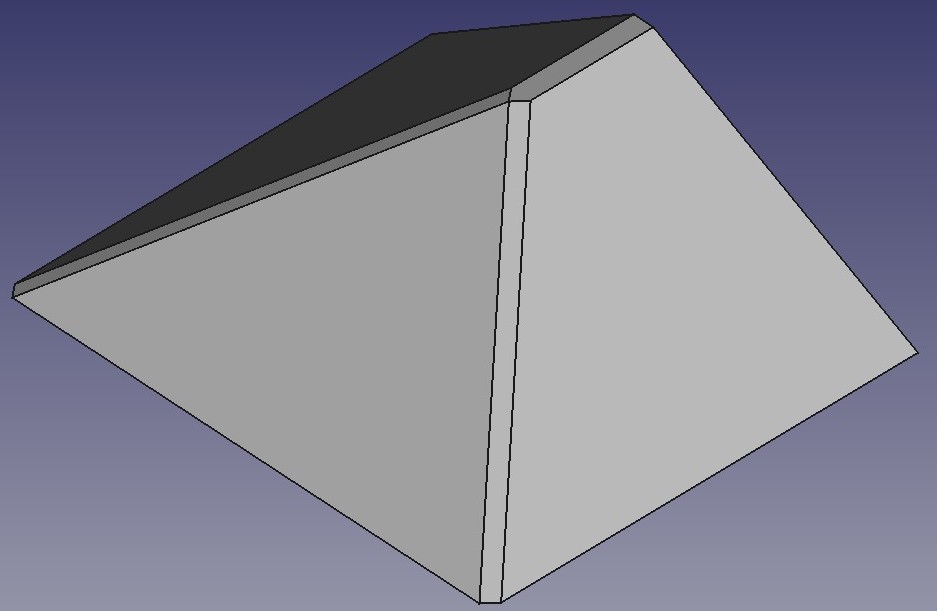
The strips have a flat base, which means that the ridges of your model roof will also need to be flattened to match, as shown in the illustration to the right. The tiles of the triangle and round types are raised above the base and have a small overhang that is intended to cover the joint between your main roof surface and the ridge strips. The raised section under the overhang is angled to match (perpendicular to) the slope of the main roof surfaces. All roof surfaces are assumed to be at the same angle to the horizontal.
This arrangement is intended for use with my preferred form of model roof construction, which consists of a basic structure formed from plastic sheet or foamboard, supported by appropriate internal "trusses" made from similar material, on top of which is fitted a layer of plastic sheet embossed to represent roof slates, tiles, corrugated sheeting etc. In this case, the recommended order of construction is:
- make the basic roof structure with sharp ridges, and allow the glue to dry.
- flatten the roof ridges, e.g. by making an initial cut along a straight edge (placed a little above the intended finished edge) with a sharp knife to remove the bulk of the material, then finish with a large flat file or abrasive paper wrapped around a sanding block. The width of the flattened ridges needs to match the base width of the strips.
- fit the ridge strips.
- fit the main embossed roof sheets, carefully cut to shape to fit neatly under/against the ridge strips.
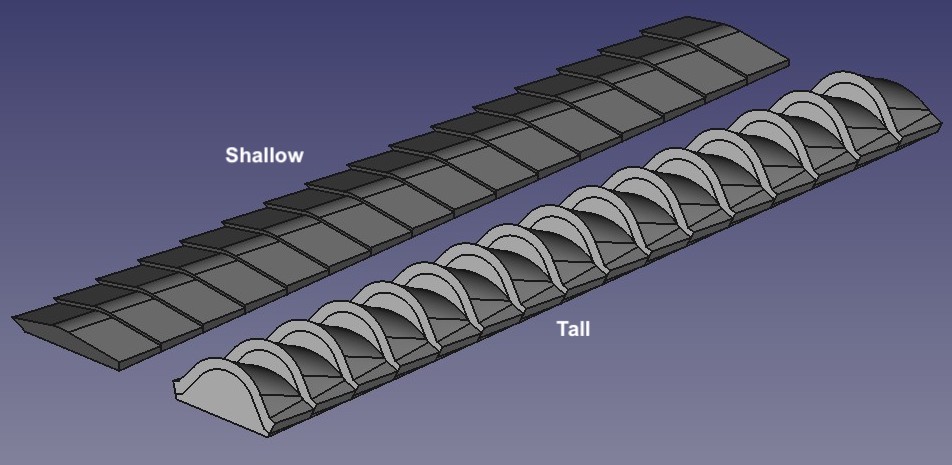
The special hip ridge strips, which are shawn in more detail to the right, do not have the raised overhang, but are intened to butt against the main roof surface layer. Therefore you will have to take great care when cutting the roof surface material to shape/size to minimise any gap. The strips are configurable for edge thickness, to match the thickness of your chosen roof surface material.
All of the strips and tiles shown in the illustrations use (where relevant) a tile length of 15 inches, tile height of about 6 inches, edge thickness of 0.75 mm, tile angle of 45°, roof angle of 30°, and a strip length of about 50 mm, in 4 mm scale. The dimensions given in inches refer to the prototype size; the size of the model tile strips will then depend on the scale chosen. Elsewhere on this page dimensions given in feet and/or inches likewise refer to the prototype size. (A table to help convert prototype inches into model mm is given at the bottom of this page.) Subsequent illustrations also use these tile sizes as standard.
A variety of additional features can also be added to the basic ridge strip types, as illustrated in the images to the right. The features currently available are:
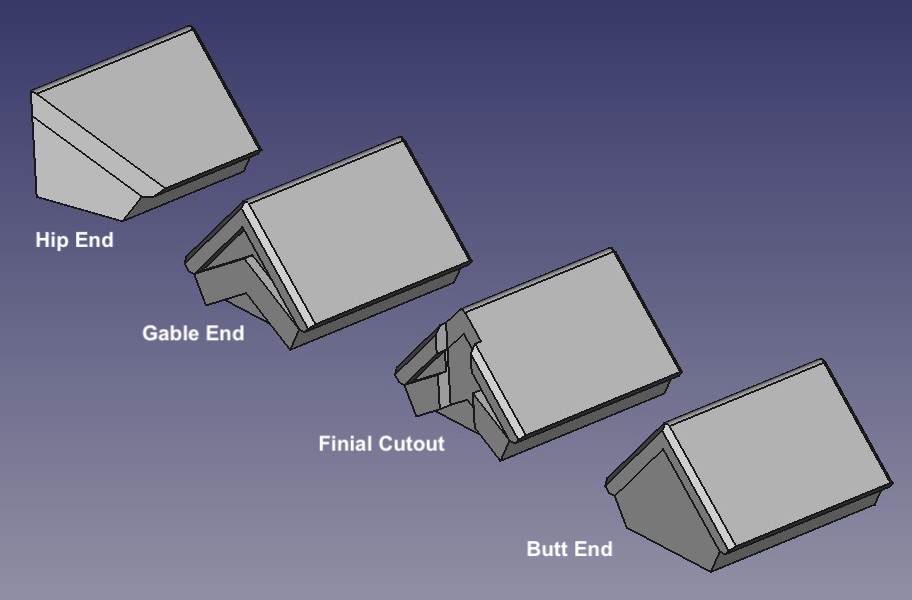
End Types
The ends of a strip can be finished in several ways, as shown to the right:
- Butt or plain end, for use where two strips are to be joined to create a longer one.
- Gable end, for use at the ends of a gable roof. This has recesses to represent continuation of the main roof material (tiles, slates, etc.) and to allow for the thickness of a bargeboard to be fitted under the end of the roof.
- Finial cut-out, as for gable end type, but with an additional recess to allow for the post of a finial to be fitted to the bargeboard.
- Hip end, for use at the bottom end of a hip ridge using the normal ridge types. The special hip ridge strips should not need this.
The ends of a strip can be finished with the same or different end types.
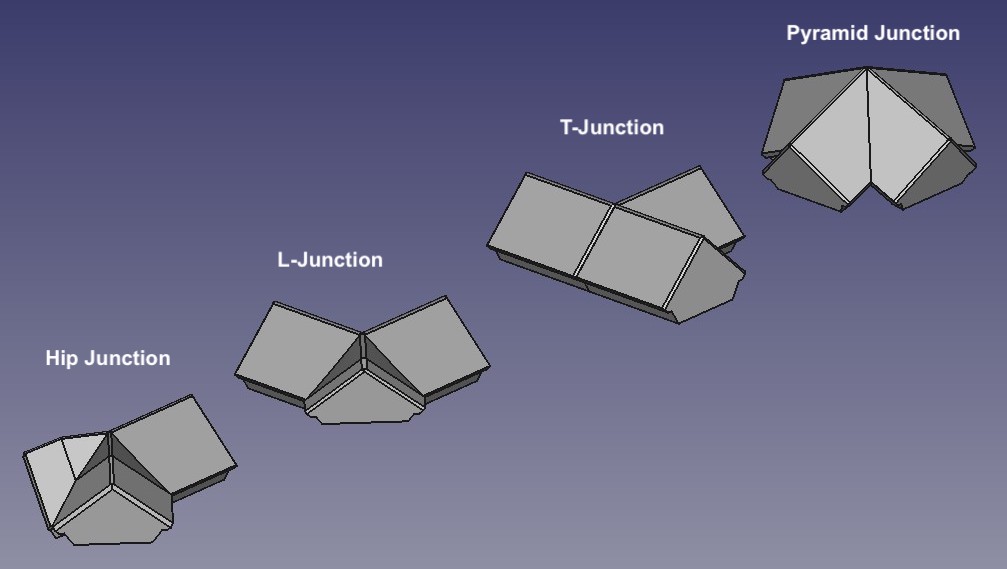
Junction Types
These are intended to cope with the situations where two or more roof ridges meet. They are supplied as separate components, finished with butt-ends, but ordered along with a strip as though joined to one (or both) ends. This is because some of their features descend below the base level of the main strip, making printing impossible. The junction types availabel are:
- T-junction. Used where two roof ridges meet at the same level and at right-angles to each other.
- L-junction. Used where two roof ridges meet at the same level at a right-angled corner, with the outer corner roof surface joined in a sloping hip ridge.
- X-junction (not illustrated). Used where four roof ridges meet at the same level and at right-agles to each other.
- Hip junction. Used for a conventional hipped roof, where the main roof ridge meets two sloping hip ridges.
- Pyramid junction. Used at the peak of a pyramid-shaped roof, where multiple sloping hip ridges meet. Four hip ridges, for a square-based pyramid, are shown, but may be congfigured for 3–8 ridges (triangle–octagon-based pyramids).
- Half-pyramid junction (not illustrated). Similar to the Pyramid junction, but the hip ridges are spread evenly around 180° rather than 360°, and meet with a normal (level) roof ridge. The result is a normal roof with a pyramid end.
- Corner-pyramid junction (not illustrated). Similar to the half-pyramid, but with the hip ridges spread around 90° at the outer corner of an L-shaped roof. Two level roof ridges also meet at the junction, at 90° to each other.
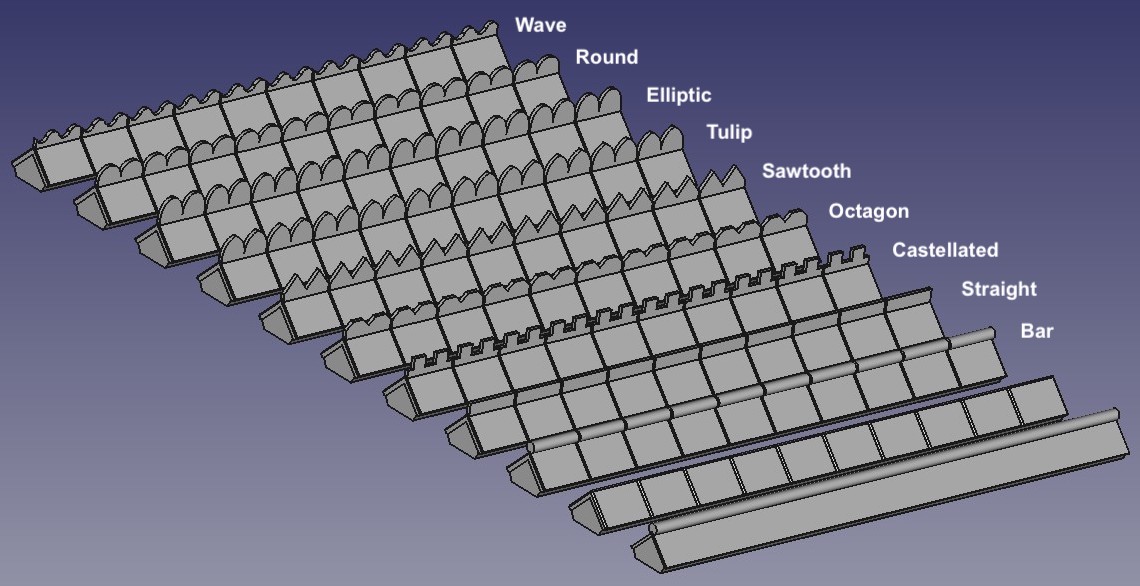
Ridge Decoration
The ridge of the triangle and round strips can be decorated with either a round bar or a raised thin fin, the latter style is sometimes known as a "cock's comb". The top edge of the fin may be straight, or shaped with a number of "teeth". The teeth may be shaped in a number of ways:
- Square, giving a "castellated" effect.
- Half-octagonal.
- Triangular, giving a "sawtooth" effect.
- Circular arcs with a pointed top, giving a "tulip" petal effect.
- Half-elliptical.
- Half-circular.
- Alternately reversed circular arcs, giving a "wave" effect.
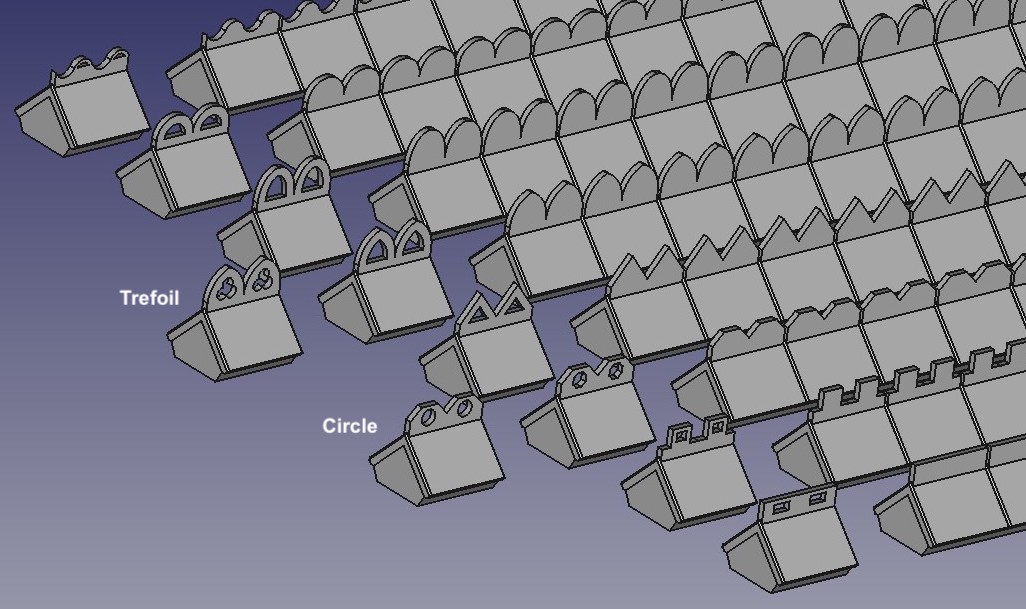
The teeth can also be solid, or pierced with holes that are:
- the same shape as the tooth,
- circular, or
- trefoil (three overlapping circles) in shape.
The number of teeth per tile can be specified, as can the fin height or bar diameter. The fins shown have 2 teeth per tile. The height of any teeth are set to between 1/2 and 2/3 of the overall fin height, depending on their shape.
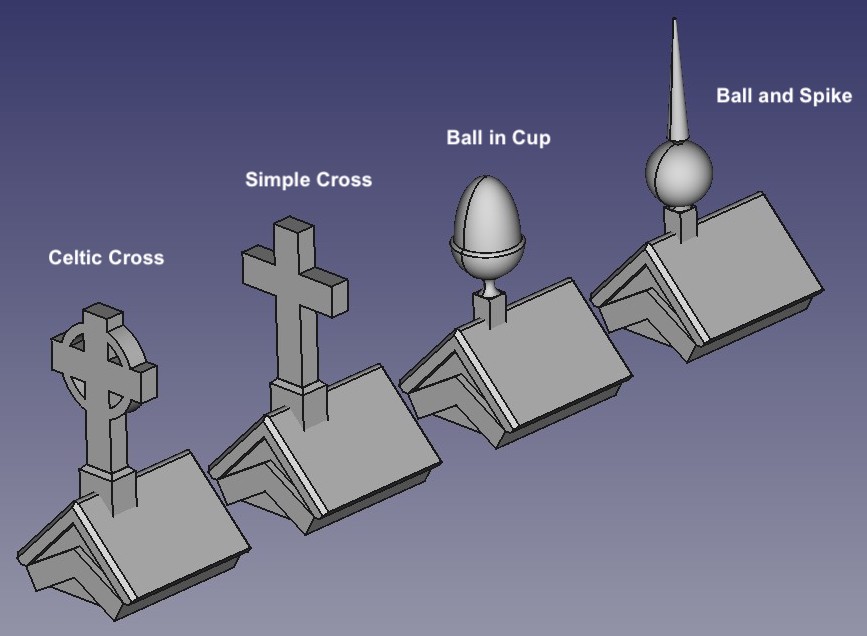
Finials
A finial can be added to one or both ends of a strip, or to the meeting point of a junction tile. The finial types available are:
- Ball and spike, mounted on a post. The spike is a tall, thin cone. The diameters of the ball and lower end of the spike can be specified, along with the height of the spike. The post can be square or circular, and its size and height can be specified. The ball or spike may also be omitted, giving just the ball or just the spike on the post.
- Ball in cup, mounted on a post. The diameter of the ball can be specified, the diameter of the cup is then 2 inches bigger. The height of the ball above the cup can also be specified separately: set to half the ball diameter (i.e. ball radius) gives a sphere, set greater than the ball radius gives an ellipsoid – giving an egg-in-cup or acorn-like effect. (In the illustration, the height is set to the ball diameter.)
- Simple cross, supported on a rectangular post. The height and thickness of the cross can be specified, as can the height of the post. The post is set 1 inch larger on each side than the base of the cross, and its top is chamfered. The bottom leg of the cross is set to twice the length of the other lobes, which are assumed to be square.
- Celtic cross. Similar to the simple cross, but with the addition of a ring.
In each case, the finial is set 1/3 of the way along the end tile. If a ridge decoration is also specified, this will occupy the other half of the end tile.
Configure Your Ridge Tiles
To order some of my ridge tile strips you will need to configure each strip specification and add the appropriate quantity to your basket. Select the basic strip type (as described above). To add an end or junction, ridge decoration and/or finial, select the type(s) you require and click on the "Change Type" button. Further controls will then appear that will allow you to set the various configurable dimensions. You will also then be able to set the quantity of strips to include in your basket. Each strip will cost £0.95.
To keep the number of configuration option values down, while still covering the wide range of scales, many of the configurable dimensions are specified in scale inches, rather than model mm. A calculator and look-up table to help convert scale inches into model dimensions (or vice versa) is available here (opens in new browser tab/window).
Note: If you want a ridge tile component that is not covered by the standard options below, I will be happy to quote you for a customised component. Please contact me with full details.