
Decals for British Railways
Loco Headcode Panels
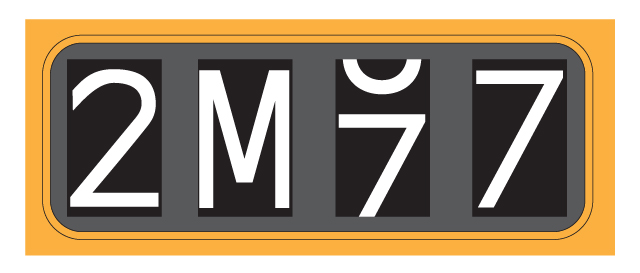
These decals are for the standard British Railways/British Rail headcode panels used on diesel and electric locos. Some multiple units also used headcode panels of this pattern instead of the distinctive narrower version. Decals for the latter pattern are available here. Decals sheets are available separately for the headcode characters and overall panel frames, and in a variety of scales. In the larger scales each character sheet contains decals for at least one panel. In the smaller scales decals are provided for at least two panels (i.e. one loco). With suitable choice of characters, a sheet can supply decals for more panels than the minimum. The decals will be printed on paper up to A5 in size for ease of posting.
There were several styles of headcode panels commonly used on diesel and electric locos:
4-character panel, equal spacing. |

4-character panel, roof-mounted. |

2-character panel, window-mounted. |

2+2 panel, 4 chars with central division. |

Twin 2-character panels. |
|
Note: Clicking on any of the images on this page, such as those above, will cause a larger version of the image to appear in a new tab or window of your browser (depending on how your browser is set up). | ||
The Decals
Heacode Characters
The character decals are available on waterslide decal paper with either an opaque white backing, or with a transparent backing (in this case the character shapes will be transparent). They will both need a flat support of suitable material such as plastic sheet. If you are to provide back-illumination for your panel, the white-backed decals are thin enough to allow some light through, but the illumination will probably need to be bright, and the support should be transparent. The transparent-backed decals allow much more light through, but the support will need to be a translucent white colour to give a white appearance to the characters when the illumination is switched off.
The individual character decals are arranged in closely-spaced vertical strips to allow mis-aligned characters (as shown above) to be modelled easily. Four different sheet layouts are available, depending on your chosen scale, three of which are illustrated here:

Sheet A. |

Sheet B. |

Sheet C. |
Sheet type A is for most scales, and contains a four full sets of numbers (with two different shapes of 2), a full set of letters, 4 each of three different sizes of circular spots, 7 white blanks, and 6 black blanks. In 16mm scale this many decals won't fit on a sheet of A5 paper, so two different sheet types are available: B with numbers and letters, and C with numbers, spots and blanks. A fourth sheet type, D, is for the smaller scales and contains two complete sets as sheet A side-by-side.
The shapes of the numbers and most of the letters are taken from photographs of real headcodes. The letters I, O, and Q are omitted from the sets, because of potential confusion with the numbers 1 and 0. I have also included some letters for which I have no photographic evidence: R, U, W, and Y. Their shapes therefore may not be accurate, and they may not have been included in the real headcode sets anyway.
As with all of my decals, the backing film (white or transparent) will be continuous across the sheet, so you will need to cut the decals to size. Cutting guides (short lines around the edges of each decal) are provided to help with this. It is usually better to use a light cut around the decal edges with a sharp knife, just deep enough to cut the film but not all the way through the supporting paper, then cut through the paper further away from the decal edges. The extra paper can then act as a convenient "handle" to help transfer the decals to your model. Once released by soaking in water, the excess film is best removed before sliding the decals into position on your model.
These decals are designed for an aperture size of 15in. high by 9in. wide. The apertures are the openings in the frame behind which the individual characters appear. This frame sits immediately in front of the support for the headcode characters, and behind the front glass, see below for further frame details. This aperture size is my best estimate from photographs, and therefore may not be right for your loco. When configuring your decals below you can set a different aperture size to suit your loco. However, in certain scales setting a much larger aperture size may cause problems fitting all of the decals on a single sheet: I will contact you if this is the case, for you to decide which decals to omit.
The longer horizontal, and inner vertical, cutting guides are set to the aperture size. The shorter horizontal and outer vertical guides are set to give a border of 1mm around the aperture, but it is up to you to choose a border size when cutting your decals from the sheet.
Headcode Frame
The joints between adjacent headcode decals will be visible through the headcode panel front glass, especially if the apertures are quite widely spaced. A frame is therefore needed between the glass and the character decals to hide these joints, and provide a better representation of the the construction of the real panel. In the larger scales this frame is probably best implemented using a sheet of thin material such as plastic sheet, with the appropriate aperture holes cut in it and painted matt black. For the smaller scales, or if you so choose, I can also provide a frame implemented as further decals, printed onto a sheet with transparent backing, such that the aperture holes are transparent for the characters to show through. Depending on your chosen scale, at least 4 identical frame decals will be provided on each sheet, configured to your specification.
The frame decals will need to be applied directly on top of the character decals on their support, so allow the character decals to dry throughly first, and maybe apply a coat of varnish to protect them. You will also need to accurately align the character decals with the apertures in the frame decal: guides are provided around the edges of the frame decals to help with this. Full instructions for applying my decals will be provided with your first order, or are available here.
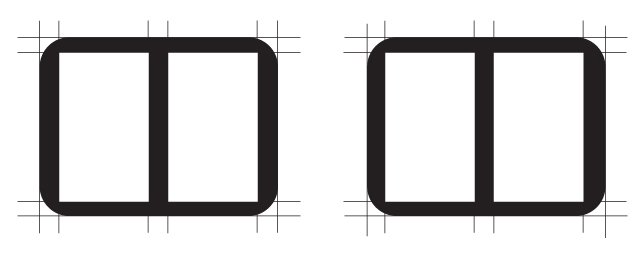
In the illustrations above, the frame areas on both the character and frame sheets are shown as dark grey to show the black aperture areas around each character. For the actual decal sheets, these areas will be black the same as the character/aperture backgrounds. If you make your own frames, Railmatch R205 "Rail Black" is a good match for the black produced by my printer.
Typical frame decals corresponding to the panel illustrations above are shown below, complete with cutting and aperture position guides. The latter are to help you position the character decals rather than cut out the apertures from the frame decals. They will therefore need to be transferred to the support with appropriate markings. The red arrows show the minimum and maximum dimensions you will need to specify for frames with horizontal and/or vertiacl tapered edges.

4-character panel, equal spacing. |

4-character panel, vertical taper. |

2-character panel, window-mounted. |
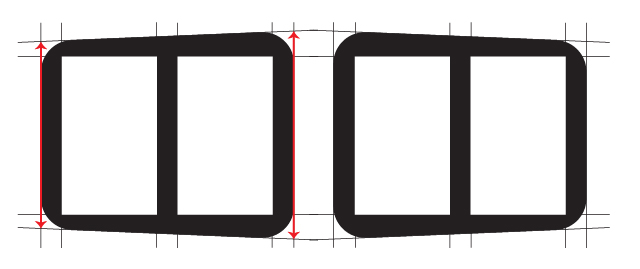
2+2 panel, 4 chars with central division and horizontal tapers. |
Twin 2-character panels. |
Configure Your Decals
To order these decals, please specify the information requested below to configure your set to your precise requirements, then click on the appropriate "Confirm Specification" button. Separate buttons are provided for ordering a sheet of headcode characters or a sheet of frame decals. A second page will then appear showing the details you've entered along with a button that will allow you to add the set to your basket. You will also have the opportunity to return to this page to make changes. If you wish to order both character and frame decals, you will need to add one sheet to your basket first, then return to this page to add the other. Your configuration settings should still be present on your return to this page.
Note: If you navigate away from this page before you have clicked on the "Confirm Specification" button, you may lose any information you have entered.