
Custom Decals
Artwork Preparation Guide
This guide is to help those who wish to prepare custom decal artwork for me to print onto decal paper. Please also see the companion guide for providing me with information to produce the artwork for you.
For detailed information about how to apply the finished decals, please see my application guide.
This guide is also available in downloadable form here.
Page Format
For ease of posting, please use a maximum page size of A5, the largest size that can be posted using normal letter postage rates. I can print up to A4 size, but this will incur additional postage costs. It will generally be better to organise your decals as multiple A5 sheets (or smaller). Extra large decals that need the extra A4 sheet size will be difficult to handle without creasing or tearing during application too.
Please also allow a blank border of at least 1 cm around all sides of each sheet, as my printer cannot print right up to the edge of the paper.
File Format
You can prepare your decals using either a vector-based app, which stores your artwork as a collection of lines and filled shapes, or using a bitmap-based app, which stores your artwork as an array of individual pixels. Vector artwork will generally require a much smaller file size than bitmap, and will therefore be much easier to send by e-mail. Bitmap artwork, however, gives you control of individual pixels (possibly important for making small features visible in the finished decals, see below) and supports arbitrary images derived from photos or scans. For bitmap artwork use a resolution of at least 300 dpi, or ideally 600 dpi to make the most of my printer's resolution.
To send large files to me you could use some sort of internet file-sharing service, in which you upload your file to the service, then send me a link to it that I can use to download your file. Alternatively, if your decal sheet will contain many copies of a few decals, you can send me artwork for just one set of different decals that I can then duplicate to fill the sheet.
I use an Apple Mac (Mini) computer, so the actual file formats you use to send your artwork to me need to be compatible across computer types – I will probably have difficulty reading native Windows formats, especially of the very latest versions. The most portable file format is Adobe's PDF, which can also handle both vector and bitmap artworks, and indeed a mixture of the two in one file. Alternatively, for vector artwork I should be able to read SVG files, and for bitmap artwork TIFF and PNG should be suitable. The JPEG format can also be used, but use a very high quality setting to minimise the impact of the lossy compression inherent in this format. If you have access to Adobe's Creative Suite apps, the native Photoshop (PSD - bitmap) and Illustrator (AI - vector) file formats can also be used.
If your artwork includes lettering that has not been converted to shapes or bitmap form, please embed/include the necessary font data in the file you send me, as I may well not have the font on my computer. Some file formats provide for this as an option when you setup your document or save it to a file format other than the one you work with.
If you build up your artwork in layers (recommended), then retaining the layer information in the files you send me is worthwhile so that I can more easily tweak your artwork for printing should I need to, although for bitmap files this can greatly increase the file size.
Colours
You will also need to specify what colours are to be incorporated into your decals. Any colours you build into your artwork will come out of my printer differently, so I will need to determine what colours I need to give my printer to produce the colours you require. Colour prototype photos can be useful, but for a more precise specification you will probably need to specify a paint colour or even provide me with physical samples. To cover this subject in more detail, I have prepared a separate companion guide to help you specify colours to be incorporated into your decals.
Once any custom colour matching process is complete, and for paint colours I have already matched, I will supply you with the corresponding colour specifications for you to incorporate into your decal artwork. These will take the form of standard red, green and blue (RGB) levels, each in the range 0 to 255. For example, white is 255, 255, 255 and black is 0, 0, 0.
For decals to be printed onto transparent paper, set the transparent areas to pure white (RGB 255, 255, 255).
Please use an RGB colour mode, rather than CMYK, for the files you send to me.
Decal Design
Cutting Guides
The backing film (whether transparent or white) of my decals will extend continuously across the whole sheet. The individual decals will therefore need to be cut accurately to size and shape during application. This is best done in two stages: a light cut around the edge of the decal, just deep enough to cut through the backing film but not the thicker carrier paper, then a heavier cut all the way through the paper a few mm away from the decal edge cut. Once the decal has been soaked in water to release the film from the paper the excess film outside of the decal should be removed before applying the decal to its intended surface. This creates a useful "handle" around the decal making it easier to slide accurately into place.
Your decals should therefore be designed to accommodate these cuts:
Allow at least 5 mm between the edges of adjacent decals.
Incorporate cutting guide lines to mark the edges of the decal:
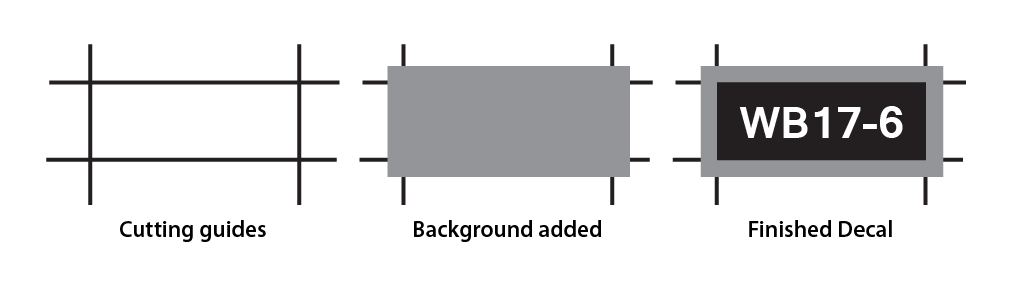
These guides are thin straight lines that mark the edges of the decal. A patch of background colour is then added on top, and should overlap the guides so that the cuts have background colour on both sides of the cut. The actual decal features are then built on top of the patch.
For transparent decals use a white background patch to ensure that the guide lines do not appear within the cut decal. Decals that are white around their edges should also use a white background patch, rather than a matched background colour. The edges will then not require touching up with thinned paint.
Ideally, the cutting guides should be of the same line width as the thickness of the blade of the knife you intend to use to cut them out. That way if you then place the straight edge you use to guide the knife along the outside edge of the guide line, the knife should then cut along the centre of the line (assuming the taper of the cutting edge is symmetrical within the thickness of the blade). The centre of the guide lines should therefore be positioned exactly along the edges of your decal.
Curved edges to decals are best avoided if at all possible, but if you must have curved edges (e.g. to cover an entire non-rectangular object with a decal), use a very sharp knife with a small point to make the curved cut. Such decals may have natural features to mark where the curved cut needs to be made, either accurately along the edge of the decal, or a small distance away.
Small Decal Features
It is possible that you need to incorporate into your decals some very small features (such as lettering), perhaps only a few pixels in size. Such features may not print very well, or even not at all. There are two aspects to this problem: the feature may simply be too small, or the feature may not align very well with the positions of the underlying pixels, particularly if the edge of the feature is at an angle other than vertical or horizontal or is curved. In this case the pixels either side of the feature's actual edge will be set to a colour that is a blend between the colour of the feature and that of its adjacent background. The edge of the feature will therefore be indistinct and the effective size of the feature will be reduced, making it less visible.
The way around this is to make the feature a little larger than it should be. This can be done in several ways:
Lettering can be made bolder than it should be, while also reducing the spacing between characters, to maintain the same overall length of the text.
For vector artwork, you can add a stroke (line) around the edge of the feature. The stroke only needs to be a few pixels (a fraction of a mm) wide, and should be the same colour as the main body of the feature. This can generally also be done to lettering, although you may need to convert the letters to shapes (save a copy of the lettering and make it invisible, so that you can edit the text in the future – once converted to shapes the text will be difficult to edit).
For bitmap artwork, select all of the pixels of the feature, including those of modified colour around its edge, then fill the selected pixels with the main feature colour. If this is insufficient, once you have selected all of the pixels, you may be able to expand the selected area by one or two pixels.
Using these techniques on lettering will make the text less legible (although text small enough to require this treatment is unlikely to be legible anyway), while retaining the overall size and general shape of the text as a whole. Individual letters will merge together, but the overall shape should retain some semblance of being lines of lettering.
If you have access to a printer of your own, you may be able to experiment with these techniques to see their effect on the printed output. Otherwise, if you are using vector artwork, you can try converting it to bitmap (sometimes referred to as rasterizing) as a test to get some idea of both the problem and the effect of the techniques described above.
Finally, if you send your artwork to me in a form that I can edit easily, I can try to improve the printability of small features for you, using some or all of these techniques as necessary. Small adjustments or tweaks to your artwork such as these will be included in my standard printing fee, at no additional cost (as will simple duplication of individual decals to fill a sheet).
Surface Features
Many models contain raised or recessed details in areas that you may want to apply a decal. Such details can include bolt and rivet heads, straps and stanchions, surface corrugations, grooves between planks and panels, etc.
Small and/or narrow (less than 1 mm wide) and /or shallow (less than 0.5 mm thick/deep) shouldn't cause too many problems when applying your decals, the decal film should follow them reasonably easily. It can help to to apply vertical pressure with a soft pad, such as a paper towel or cloth folded over several times, or even the end of your finger, to help persuade the decal to follow the surface details. Be sure to avoid sliding the pad sideways as that will drag the decal out of position. A small soft brush (e.g. an old paintbrush with the bristles cut to a few mm long) can also be useful.
For small but high details, such as bolt or rivet heads in larger scales, the decal can be carefully pierced or cut over the feature during application to help the decal sit around it. Pricking the decal with the end of a finely pointed knife is often sufficient, or for longer cuts use a small radius curved knife blade and gently rock it to and fro rather than dragging it to create a short cut (or cuts in the shape of a cross). If you're using white decal paper, you will need to touch up the pierced area with appropriate paint once the decal has dried.