
British Railways Wagon Decals
Early Period
This page describes my current range of decals for model British Railways wagons, and covers decals for small groups of markings; decals for full wagon sides with options for weathering and dilapidation are in preparation and should be available shortly. These decals are for the original style of wagon markings, applied from nationalisation until the early sixties when a revised form was introduced, although wagons in the original style would have been seen long after the new styles was introduced. A selection of wagons in various liveries is illustrated below:

Diagram 1/102 wagon, hybrid MoT/BR livery. |

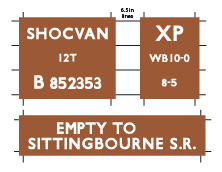
Diagram 1/104 wagon, standard British Railways non-fitted livery. |
Note: Clicking on any of the images on this page, such as those above, will cause a larger version of the image to appear in a new tab or window of your browser (depending on how your browser is set up).
The transition period just after nationalisation, in which new wagons were turned out (and old ones repainted) in a hybrid livery with a mix of new and old (grouping era) lettering and/or colours, can also be accommodated by these decals, to a certain extent. The configuration options below allow you to specify grouping era body colours with the new standard lettering (Gill Sans).
The decals are available in a variety of scales and configuration options provided below hopefully cover a wide range wagon types, both revenue-earning and railway-only use. There will inevitably some specialised wagon types not catered for by my standard options; I will gladly produce decals for such wagons on a custom basis, please contact me with full details for a quote. In particular, removable containers, and tank wagons and other wagons that remained in private ownership are not catered for below. I am working on separate ranges of decals for these.
The range of configuration options available is quite extensive, so once I have generated the artwork for your chosen wagon in response to your order, I will send you an illustration by e-mail, for you to check and if necessary make changes before I finally print your decals and send them to you.

Decals for non-vacuum-fitted wagon, standard layout.
Decals for vacuum-fitted wagon, standard layout.
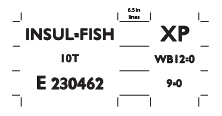
Decals for insulated wagon, standard layout.
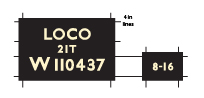
Decals for non-revenue wagon, standard layout.
Livery Details
Five basic colour schemes were used for wagons, the major livery features being illustrated as decals in pictures to the right:
- Revenue-earning wagons without vacuum brakes were painted a grey colour, with white lettering and other markings that were usually surrounded by a black background patch. The size of the black patch varied, from surrounding all lines of a lettering group, to small individual patches around each marking. The shade of grey also changed, getting lighter over the years – I provide 3 options.
- Revenue-earning wagons fitted with vacuum brakes were painted a bauxite (rust-like) colour, with white lettering and other markings. Black background patches were generally not used. The shade of bauxite paint used changed over the years – I provide 3 options.
- Insulated wagons were painted white with black lettering. The later ice blue colour came in at the same time as the revision in markings, so isn't really appropriate for this style of lettering, but I include it as an option to cover the transition period when blue could have been used with the older style of lettering.
- Non-revenue wagons, such as those for loco coal and engineering department use, were painted black with either white or yellow lettering. Loco coal wagons later reverted to grey with white markings.
- A few wagons that were often used in passenger trains were painted red with yellow lettering. For some of these, the ends were painted black, further following the carriage style. The shade of red was reputedly between the crimson and maroon shades used on passenger carriages. I offer the choice of the standard crimson and maroon colours.
Where yellow lettering was used (liveries 4 and 5), the shade of yellow used is not clear; I provide options for the straw and cream colours used on locos and coaches.
With all five schemes, the solebars, underframes and running gear were painted black, although in the early days after nationalisation some wagons were turned out with body colour for these parts.
The body-side markings were generally grouped into two areas, in the lower left and right hand corners. The lower left group contained up to 3 lines: wagon type code, load weight, and wagon number. The type code was sometimes positioned separately, near the centre of the wagon side. The lower right group also contained up to 3 lines: "XP" (only if vacuum-fitted), wagon wheelbase (in feet-inches, generally only if 10 feet or greater), and tare weight (in tons-cwt). Some wagons also carried extra instructions, such as empty return working destinations or loading restrictions. The position of these varied, and was sometimes surrounded by a thin white border.
The standard letter shapes were a form of Gill Sans, in a variety of sizes (letter heights):
- 3 or 6 inches for the wagon type code,
- 3 inches for the wagon number, with 3 1/2 inches for the prefix letters,
- 4 inches for the XP markings,
- 2 inches for the load weight, tare weight, and wheelbase,
- 3 inches for the additional instructions.
An italic script style of lettering was also sometimes used, particularly for some or all of the additional instructions markings. Where mixed lettering was used, most of the instructions were italic, with the destination name in Gill Sans. In the early days after nationalisation, the tare weights on Western Region wagons often also used italic script rather than the standard Gill Sans.
Lettering was generally all upper case, except where italics were used, when mixed upper and lower case could be used.
The standard spacing between lines of markings was 3 to 4 1/2 inches. On wooden-bodied wagons wih horizontal planks, the line spacing was usually the same as the plank spacing, with the markings generally centred vertically within the planks. Options are provided below to allow you to specify the line heights for your decals.
For wagons with low sides, without space for the standard layout, the markings were often arranged in a single line, often with the load weight immediately to the left of the wagon number, separate type code, and XP/wheelbase (if present) to the left of the tare weight. The letter heights could also be reduced if necessary. This form is illustrated to the right. The external side framing of some wagons also gave rise to non-standard layouts of otherwise standard markings.
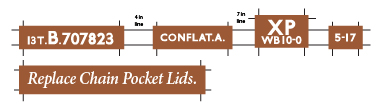
Decals for single-line layout.

Decals for shock absorbing and mineral wagon end door stripes.

Decals for mineral wagon bottom door stripes.
Shock-absorbing wagons had three white vertical stripes on each side and on both ends. For open wagons, the stripes extended most of the height of the side; for vans they were typically half- to two-thirds of the body side height. On the sides, the stripes were positioned either side and down the centre of the side door. On the ends, the stripes were generally spread symmetrically across most of the width of the end, but some only used the left-hand half. Later on the stripes became much shorter and fatter, almost square in shape.
Mineral wagons with an end door had diagonal white stripes on each side at the door end (both ends if the wagon had doors both ends). Black background patches were generally not used. The ends of the stripes should be vertical, and the upper ends should be next to the door hinge (i.e. not necessarily the full height of the side). For wooden-bodied wagons with metal diagonal straps, the straps were simply painted white. In model form, in all but the smallest of scales raised rivet or bolt head detail will make fitting decals to the straps difficult – it will probably be simpler to paint the straps as was done to the prototype.
Mineral wagons with bottom doors had small white stripes in pairs to create a "V"-shape adjacent to the doors (usually in the centre of the wagon, unless fitted with multiple sets), to mark their position. Black background patches of variable size were often also used, especially on grey wagons.
Brake vans generally followed liveries 1, 2 or 4, depending on their use. Their normal markings should also be accommodated by the standard configuration options below.
The Decals
As discussed in more detail elsewhere, my printer does not use white ink, and only the black ink is opaque. The decals will therefore be printed onto decal paper with a white backing film, except for livery 3 (insulated wagons), which will use transparent backing film for the main body decals, and white backing film for the solebar decals. For liveries other than 3, the decals will incorporate a background colour intended to match the colour of the wagon where they are to be applied. You will need to select which colour is most appropriate for your wagon from the options given below.
The backing film (white or transparent) will be continuous across the sheet, so you will need to cut the decals to size. Cutting guides (short lines around the edges of each decal) are provided to help with this. It is usually better to use a light cut around the decal edges with a sharp knife, just deep enough to cut the film but not all the way through the supporting paper, then cut through the paper further away from the decal edges. The extra paper can then act as a convenient "handle" to help transfer the decals to your model. Once released by soaking in water, the excess film is best removed before the decals are slid into position on your model.
The background colour is arranged to overlap the cut lines to minimise the risk of including white background film in the cut decal. The white backing film, although very thin, could still be visible around the edges of the decal once in position, especially if it can be viewed edge-on. This is easily solved by touching up with thinned paint of the appropriate background colour around the edges of the decal, the idea being to tint the edges of the film while not significantly affecting the surrounding paint finish. To help with this, a border of wagon colour is provided around those decals with black background patches.
On the prototype the markings were generally arranged to avoid raised body features such as metal strapping or wooden panelling, but sometimes the design of the wagon meant that markings spanned such features. In the smaller scales, raised surface detail on your model will probably be sufficiently shallow to not cause problems with the sit or distortion of the decals. In the larger scales such detail is likely to be high/thick enough to significanly "distort" a decal laid across it. It may then be necessary to cut the decals into sections along the centre line or edges of such details, and touch up any resulting gaps in the markings with appropriate paint to link the markings on either side.
Small projections such as bolt heads can usually be allowed to pierce through the decal during application. Once the decal is in position, press down firmly on the projections using your finger or a soft pad (such as kitchen paper folded on itself several times). Be sure to apply only vertical pressure; sideways pressure will cause the decal to slide out of position. Piercing of the decal can be assisted, if necessary, by using the tip of a sharp knife: either a single small "prick", or a small cross. Larger, but still small, projections can likewise be accommodated by small cuts during application. Cuts of significant length are best achieved by rocking the blade of a small round knife along the cut, rather than dragging the point of a straight knife.
The decals will be printed on paper up to A5 in size for ease of posting. Where space is available, a spare of each decal type will be provided for you to experiment with, or in case of problems during application. Full instructions for applying my decals will be provided with your first order, or are available here.
Decals for wagon solebar.
Decals for former PO wagon solebar plates.
A set of decals for the wagon body will consist of a number of individual decals, as illustrated in the images above.
- Decals for the lower left and right corner groups of each body side, for the standard multi-line layout. Some non-standard layouts can easily be accommodated by cutting the multi-line decals into individual lines. Extra cutting guides are provided to help with this. Alternatively, decals for a single-line style of layout can be requested.
- Decals for extra instruction panels, if required.
- A set of decals for shock and mineral wagon stripes, if required. Sufficient end door stripes will be provided for doors at both ends, although one door was far more common.
A set of decals for each solebar, illustrated to the right, which can optionally include:
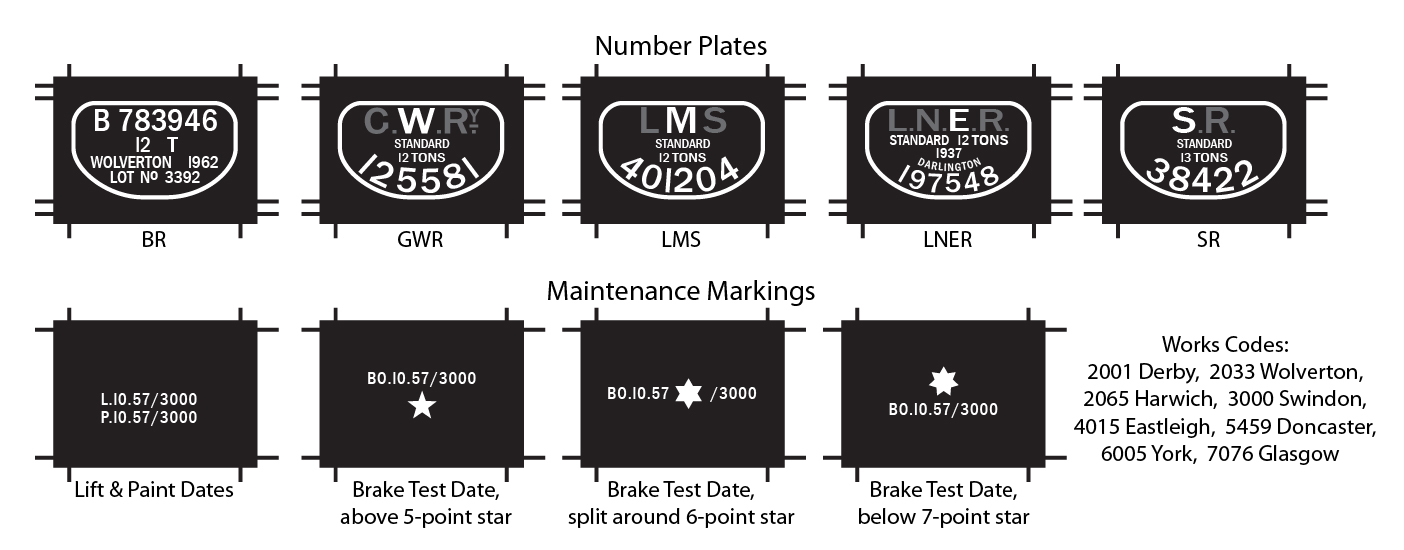
- Number plate, in either BR standard or the later (RCH standard) grouping era company styles.
- Maintenance lifting and painting date markings, usually P or L followed by date (month.year) and works code.
- For vacuum-fitted wagons, a brake release marker star and brake test date.
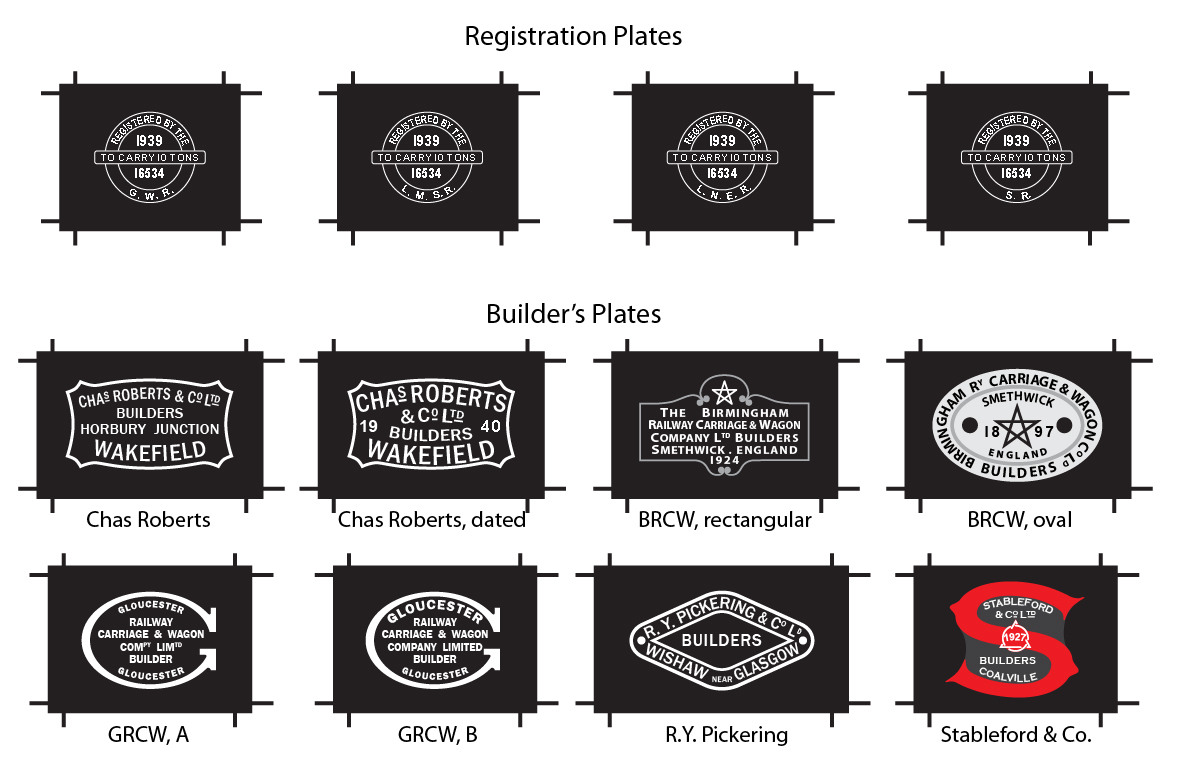
- For former private-owner wagons I can also provide registration and a selection of builder's plates, although it's not clear whether such plates were retained after nationalisation.
Note that the markings for many of the solebar decals will be very small, and probably not legible in the smaller scales. They should mostly still be visible as vague shapes, however. Very small lettering and other markings will be deliberately thickened slightly to remain visible after printing, at the expense of legibility.
Configure Your Decals
A set of these decals will cost £9.50. These decals also qualify for the standard multi-buy discount of £2.50 per set (of any type) after the first. To order a set of decals for a British Railways wagon you will need to configure its specification. This will consist of a number of steps, as described below.
To accommodate a wide range of scales, dimensions are normally specified in scale feet and/or inches, rather than model mm. Where an arbitrary dimension value is requested below, you can enter a value either in feet and/or inches, which will be taken as being a prototype value, or in mm, which will be taken as a model size value. Please be sure to include the units in your specificaion. A calculator and look-up table to help convert scale inches into model dimensions (or vice versa) is available here (opens in new browser tab/window).
Note: If you want a set of decals for a wagon that is not covered by the standard options below, I will be happy to quote you for a customised set. Please contact me with full details.
In the boxes below, where a marking is not required, leave blank or set to "None". If you do not wish to specify a deviation from standard (e.g. marking letter sizes), leave blank or set to "Standard".