
MWT/MoT Wagon Decals
This page describes my current range of decals for model Ministry of (War) Transport wagons, and covers decals for small groups of markings; decals for full wagon sides with options for weathering and dilapidation are in preparation and should be available shortly. A selection of wagons in MoT livery is illustrated below, and show some of the variations:
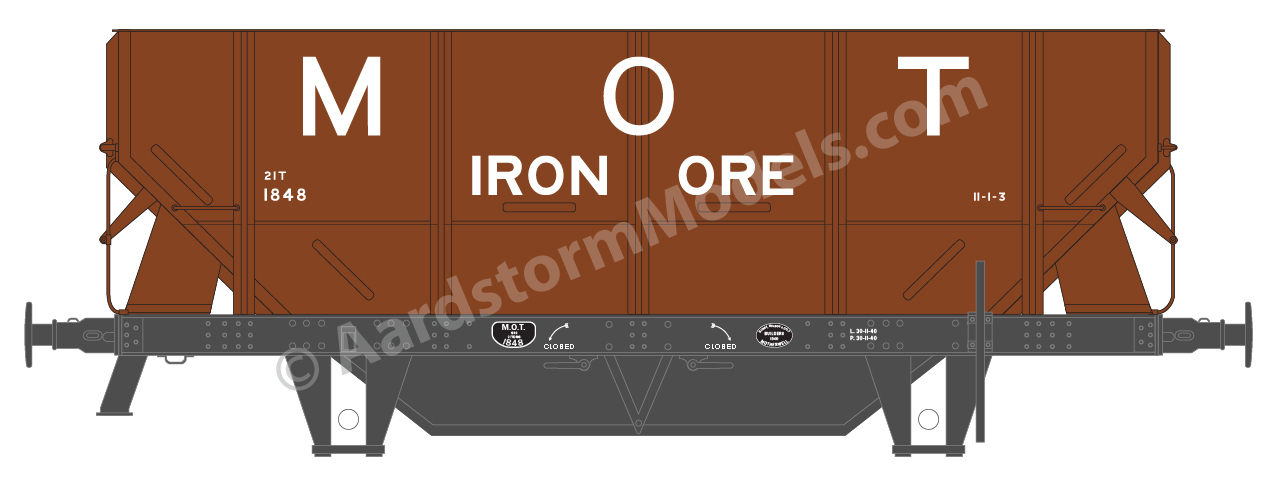
Iron Ore Hopper Wagon, LNER diagram d167, MoT livery. | |
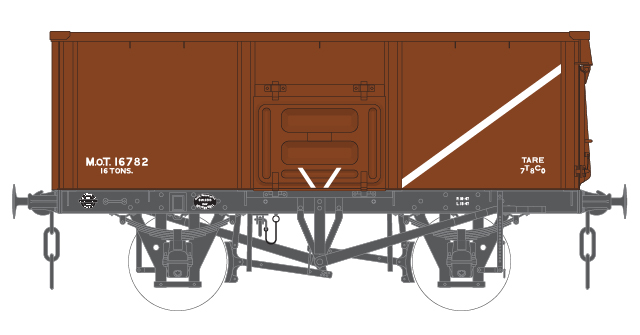
Diagram 1/102 wagon, MoT livery. |
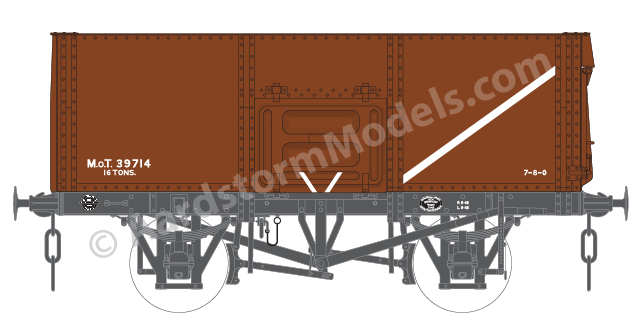
Diagram 1/103 wagon, MoT livery. |
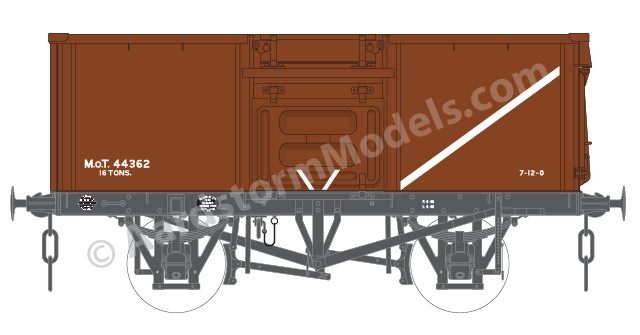
Diagram 1/104 wagon, MoT livery. |
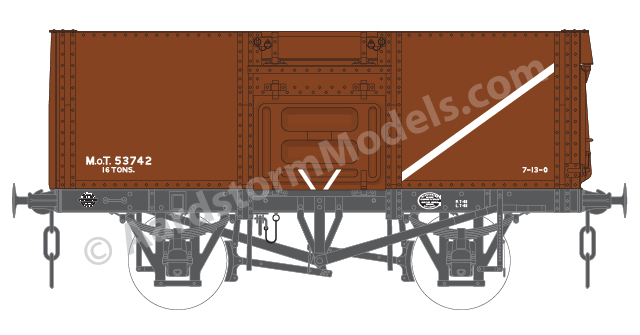
Diagram 1/105 wagon, MoT livery. |
Note: Clicking on any of the images on this page, such as those above, will cause a larger version of the image to appear in a new tab or window of your browser (depending on how your browser is set up).
History
During World War II, the Minstry of War Transport (later just Ministry of Transport) controlled the operation of many of the more common types of wagon: railway-owned wagons that were previously regarded as "common user", plus most private-owner mineral wagons. These wagons were operated as a "pool" and could be sent anywhere in the country, possibly far for the original owner's territory. The owners were paid for the use of their wagons at standard rates. The Ministry also controlled the production of new wagons, generally for the pool, to make sure that scarce resources were not consumed building wagons that were not really needed. Initially wagons were built for a specified owner, but went directly into the pool. Later, the Minstry ordered wagons for its own fleet. It is these wagons that are the subject of these decals.
The bulk of the Minstry production was for steel mineral wagons, similar in size (but higher carrying capacity) to the then ubiquitous RCH wooden mineral wagons. For most of the war Ministry-authorized wagon production was nominally for a range of private owners. Some wre finished in full private-owner liveries, but many were turned out in a standardised, simple livery with the owner's name in fairly small lettering – decals for these are in preparation. From 1944, the Ministry took ownership of subsequent wagon production, and the wagons were finished in a standardised MWT or MoT bauxite livery, as illustrated above, and described below.
After the war ended, the Ministry continued to control the use and construction of wagons until the railways were nationalised in 1948. Many wagons ordered by the Ministry weren't completed until after nationalisation, around 1950, but were often still delivered in MoT livery. The last batches of these wagons were finished in a hybrid livery of MoT colour with British Railways standard lettering – decals for these wagons are covered by my BR Early Wagons page.
After nationalisation, the Ministry wagons were transferred to British Railways ownership. They retained their Ministry numbers, but with the addition of the standard "B" prefix of a BR-built wagon. It could be several years, however, before individual existing wagons were repainted into standard British Railways livery.
Wagon Types
Minstry production started in 1940 with an order for 2500 21T steel hopper wagons for carrying iron ore, of largely LNER design but built by several independent manufacturers. Production continued into 1941 and they were turned out in a bauxite livery with large "M O T" and numbers in the range 1–2500, as illustrated above. Later in 1941 they wre all taken over by the LNER, assigned LNER numbers, and eventually repainted in standard LNER livery.
Most of the early Ministry production for steel mineral wagons was to a Charles Roberts proprietary design with sloping sides, that would eventually be assigned BR diagram 1/100. They were also built by other manufacturers, not just Charles Roberts. Some were also produced to a more conventional rival design by Hurst Nelson, who also built all such wagons. These were later assigned BR diagram 1/101. Some of these wagons were shipped to France to help rebuild the French railways, and were eventually returned to BR ownership in 1951 (diagram 1/113 was assigned to the Hurst Nelson wagons returned from France, while the returned Charles Roberts wagons joined diagram 1/100).
Then, in 1946, the Ministry ordered large numbers of wagons to a new design, for which the body consisted of a welded steel rectangular box with side, end and bottom doors. The side and end doors were of pressed steel. A similar design for riveted construction was also produced, for those manufacturers who preferred this form of construction. These designs were eventually assigned BR diagrams 1/102 (welded) and 1/103 (riveted).
However, coal traders in the London area had an agreement that limited the height of wagon sides they had to deal with. The new wagons exceeded this height, as did the previous Charles Roberts and Hurst Nelson designs. This was solved by the addition of extra doors above the side doors that folded down when open. Wagons with these doors were eventually assigned diagrams 1/104 and 1/105, for welded and riveted construction respectively. Subsequent production was to these modified designs, but existing wagons were not modified.
Livery Details
The standard livery for Ministry-owned wagons was a bauxite body colour, with white lettering and black underframe, as illustrated above. The bauxite colour is believed to have been the same as that used by the LMS. The hopper wagons used unusually large lettering, while the regular mineral wagons used lettering sizes and layout similar to contemporary railway-owned wagons: the body-side markings were grouped into two areas, in the lower left and right hand corners. The lower left group contained the owner's name (MWT or MoT), wagon number and load weight, on separate lines. The lower right group only contained the tare weight , in a variety of formats. A letter height of 3 inches was used for the name and number, while the load and tare weights were 2 inches.
The position of the end door was identified by a diagonal white stripes on each side at the door end, with the upper ends next to the door hinge (i.e. not necessarily the full height of the side). The presence of bottom doors was identified by small white stripes in pairs to create a "V"-shape adjacent to the bottom doors, usually towards the bottom of the side doors
The Decals
The decals are available in a variety of scales and configuration options provided below hopefully cover all of the wagon types ordered by the Ministry. The range of configuration options available is quite extensive, so once I have generated the artwork for your chosen wagon in response to your order, I will send you an illustration by e-mail, for you to check and if necessary make changes before I finally print your decals and send them to you.
As discussed in more detail elsewhere, my printer does not use white ink, and only the black ink is opaque. The decals will therefore be printed onto decal paper with a white backing film, except for livery 3 (insulated wagons), which will use transparent backing film for the main body decals, and white backing film for the solebar decals. For liveries other than 3, the decals will incorporate a background colour intended to match the colour of the wagon where they are to be applied. You will need to select which colour is most appropriate for your wagon from the options given below.
The backing film (white or transparent) will be continuous across the sheet, so you will need to cut the decals to size. Cutting guides (short lines around the edges of each decal) are provided to help with this. It is usually better to use a light cut around the decal edges with a sharp knife, just deep enough to cut the film but not all the way through the supporting paper, then cut through the paper further away from the decal edges. The extra paper can then act as a convenient "handle" to help transfer the decals to your model. Once released by soaking in water, the excess film is best removed before the decals are slid into position on your model.
The background colour is arranged to overlap the cut lines to minimise the risk of including white background film in the cut decal. The white backing film, although very thin, could still be visible around the edges of the decal once in position, especially if it can be viewed edge-on. This is easily solved by touching up with thinned paint of the appropriate background colour around the edges of the decal, the idea being to tint the edges of the film while not significantly affecting the surrounding paint finish.
On the prototype the markings were generally arranged to avoid raised body features such as metal strapping, but sometimes the the markings spanned such features. In the smaller scales, raised surface detail on your model will probably be sufficiently shallow to not cause problems with the sit or distortion of the decals. In the larger scales such detail is likely to be high/thick enough to significanly "distort" a decal laid across it. It may then be necessary to cut the decals into sections along the centre line or edges of such details, and touch up any resulting gaps in the markings with appropriate paint to link the markings on either side. For these wagons, the potential problem decals are those for the bottom door stripes, and the central "O" for the hopper wagons.
Small projections such as bolt heads can usually be allowed to pierce through the decal during application. Once the decal is in position, press down firmly on the projections using your finger or a soft pad (such as kitchen paper folded on itself several times). Be sure to apply only vertical pressure; sideways pressure will cause the decal to slide out of position. Piercing of the decal can be assisted, if necessary, by using the tip of a sharp knife: either a single small "prick", or a small cross. Larger, but still small, projections can likewise be accommodated by small cuts during application. Cuts of significant length are best achieved by rocking the blade of a small round knife along the cut, rather than dragging the point of a straight knife.
The decals will be printed on paper up to A5 in size for ease of posting. Where space is available, a spare of each decal type will be provided for you to experiment with, or in case of problems during application. Full instructions for applying my decals will be provided with your first order, or are available here.
A set of decals for the wagon body will consist of a number of individual decals, as illustrated in the images above.
- Decals for the lower left and right corner groups of each body side.
- A set of decals for bottom and end door stripes of each body side (for mineral wagons only).
Alternatively, you can select a set of larger decals for the body sides. These are intended to completely fill the panels between the stanchions, on either side of the side door(s) for the mineral wagons, up to the edges of the raised stanchions. The panel sizes are determined by the wagon type (diagram number) you select, and as defined by my detailed scale drawings for the wagon type. The raised detail on the side doors complicates the fitting of the bottom door decals, as described above, so these will be always supplied as "small" decals to minimise the effect of such details.
A set of decals for each solebar, illustrated below, which can optionally include:
- Private-owner registration plates, for your choice of railway company, registration number and date.
- Builder's plates, for your choice of builder and date.
- Maintenance lifting and painting date markings, and other solebar markings.
Note that the markings for many of the solebar decals will be very small, and probably not legible in the smaller scales. They should mostly still be visible as vague shapes, however.
Configure Your Decals
A set of these decals will cost £9.50. These decals also qualify for the standard multi-buy discount of £2.50 per set (of any type) after the first. To order a set of decals for a Ministry of (War) Transport wagon you will need to configure its specification. This will consist of a number of steps, as described below.
To accommodate a wide range of scales, dimensions are normally specified in scale feet and/or inches, rather than model mm. Where an arbitrary dimension value is requested below, you can enter a value either in feet and/or inches, which will be taken as being a prototype value, or in mm, which will be taken as a model size value. Please be sure to include the units in your specificaion. A calculator and look-up table to help convert scale inches into model dimensions (or vice versa) is available here (opens in new browser tab/window).
In the boxes below, where a marking is not required, leave blank or set to "None". If you do not wish to specify a deviation from standard (e.g. marking letter sizes), leave blank or set to "Standard".